


How to Connect AeroChat MCP with Claude
To connect AeroChat to Claude, copy the remote MCP server URL from AeroChat, add it as a custom web connector in Claude, complete the authorisation step and enable the connector for the conversation in which you want to use it. You do not need to write code, but the available menu depends on your Claude plan and role.
This guide was checked against Claude's current remote MCP instructions in September 2026. Connector labels can change, so use the route in this guide and confirm the latest wording in Claude's custom connector documentation if the interface looks different.
Before you connect AeroChat to Claude
Have the following ready:
- an AeroChat account with permission to configure integrations;
- the remote MCP server URL shown inside your AeroChat account;
- a Claude account;
- approval from the Claude workspace owner if you use a Team or Enterprise workspace.
Claude currently supports remote custom connectors on its web and desktop clients. Team and Enterprise organisations require an Owner or Primary Owner to add the connector at organisation level before members can connect their own accounts. Individual users can add the connector themselves from the connector settings available to their plan.
The URL is an access route to a live service, not a piece of public documentation. Copy it only from your authenticated AeroChat account and do not paste it into a public page, ticket or shared screenshot.
1. Copy the remote MCP server URL from AeroChat
Sign in to AeroChat and open the MCP integration in the admin area. Copy the server URL supplied for your account. Use the complete URL, including the protocol and path.
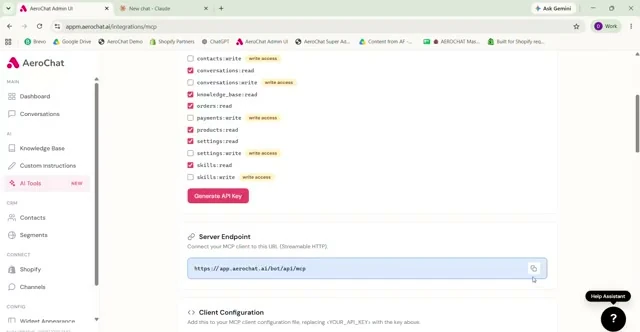
Before leaving this screen, review the permissions exposed by the connection. Start with the narrowest access that supports the task you intend to perform. Read access is easier to test safely than an action that creates or changes records.
2. Add AeroChat as a custom connector in Claude
The route differs by account type.
Individual Claude accounts
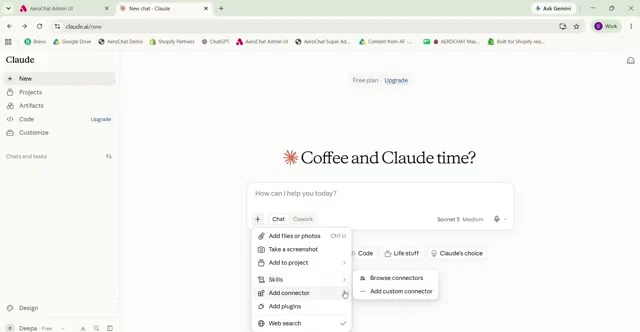
Open Customize > Connectors, select +, then choose Add custom connector. Enter a clear name such as AeroChat, paste the remote MCP server URL and select Add.
Claude Team and Enterprise workspaces
An Owner or Primary Owner first opens Organisation settings > Connectors, selects Add, hovers over Custom, chooses Web and enters the AeroChat server URL. Once it is available to the organisation, each member opens Customize > Connectors, finds AeroChat and selects Connect.
Do not add OAuth client credentials unless AeroChat explicitly supplies them for this connection. A normal hosted connector commonly starts its own authentication flow after the server URL has been accepted.
3. Authenticate and review access
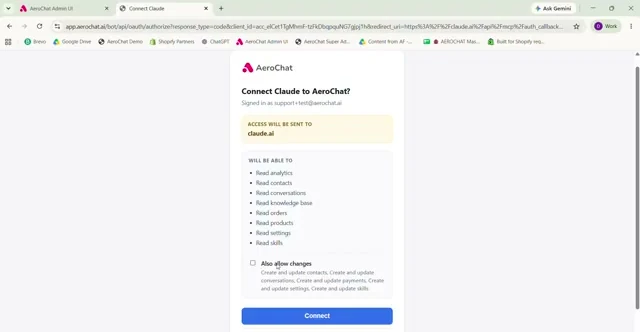
Follow the AeroChat authorisation page that opens, sign in through the official AeroChat domain and review the requested access before approving it. OAuth is designed to let Claude receive authorised access without asking you to paste your AeroChat password into a Claude conversation.
Check three things before approval:
- the browser is on the expected AeroChat domain;
- the requested access matches the job you want Claude to perform;
- the account being authorised is the correct AeroChat workspace.
If a requested permission appears broader than necessary, stop and review the integration configuration. Connecting a tool should not mean granting unrestricted access to every part of the account.
4. Enable the connector in a Claude conversation
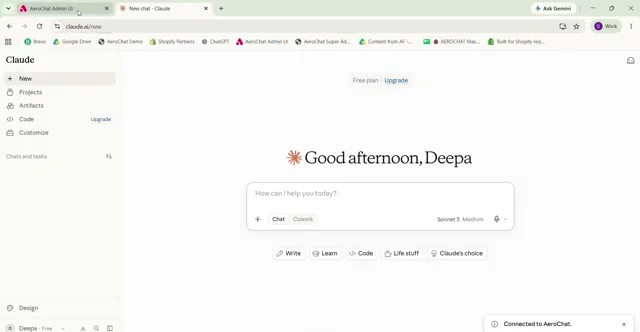
Adding a connector does not necessarily make it active in every chat. Start a new conversation, use the + menu beside the prompt, open Connectors and enable AeroChat for that conversation.
Ask Claude for a small, read-only check first. For example:
Show me which AeroChat tools are available and explain what each one can read or change. Do not take any action.
This verifies that Claude can see the connector while giving you a chance to inspect its scope before using it for operational work.
5. Test the connection with a controlled task
Do not begin with a request that changes customer data. Use a simple test account or a non-sensitive record and compare Claude's result with the source inside AeroChat.
A useful first test has four checks:
- Claude identifies the correct AeroChat tool.
- It asks for any missing identifier instead of guessing.
- The returned information matches AeroChat.
- Claude clearly distinguishes a retrieved result from an assumption.
MCP gives Claude a defined route to tools and data. It does not remove the need to verify identity, permissions or the result of a consequential action. The same operational distinction is explained in AeroChat's guide to making a chatbot perform controlled actions. For the layer that helps an AI choose the appropriate capability for a request, see how AI agent skills work.
What Claude can do depends on the tools you allow
A connected MCP server exposes a particular set of tools. Claude cannot legitimately do more than those tools and your granted permissions allow. A read tool may retrieve information; a write tool may create or change something. The connector itself is not evidence that every AeroChat feature is available through Claude.
For customer-facing workflows, AeroChat remains the AI agent platform handling conversations across its supported channels. The Claude connector serves a different purpose: it lets an authorised Claude user work with the AeroChat tools exposed through MCP. If a customer conversation needs personal attention, AeroChat's human handover workflow is the relevant customer-service mechanism.
Security checks worth keeping after setup
Treat connector governance as an ongoing task, not a one-time checkbox.
- Disable tools that are not needed for the current conversation.
- Review approval prompts before any write or delete action.
- Avoid placing customer secrets or credentials in prompts.
- Remove the connector when a user no longer needs access.
- Recheck permissions when AeroChat exposes new tools or your workflow changes.
Claude warns that custom connectors can access or act on external services and may introduce prompt-injection risk. Only connect a server copied from AeroChat's authenticated interface, and do not select an “always allow” option for a consequential tool until its behaviour has been tested.
Troubleshooting the AeroChat Claude connection
| Symptom | Likely cause | What to check |
|---|---|---|
| Add custom connector is missing | The account role or workspace policy does not allow it | Confirm your Claude plan and ask the workspace Owner to add or enable the connector |
| Claude rejects the server URL | The URL is incomplete, altered or not publicly reachable | Copy it again from AeroChat and remove spaces; do not use a private-network address |
| Authentication does not open | The connector was added but not connected, or the browser blocked the flow | Open Customize > Connectors, select AeroChat and choose Connect |
| AeroChat is connected but unavailable in chat | It is not enabled for that conversation | Open the + menu, select Connectors and toggle AeroChat on |
| A requested action is unavailable | The relevant tool or permission is not exposed | Inspect the available tools and the permission scope; do not assume the connector includes every action |
| Claude returns an unexpected result | The request was ambiguous or the underlying record differs | Retry with a controlled identifier and compare the result with AeroChat before expanding use |
Connect first, then prove one useful workflow
The technical setup is short. The more important work is proving that one narrow task is accurate, permissioned and easy to audit. Begin with read-only access, confirm the source result and expand only when the business case requires it.
If ChatGPT or Cursor is a better fit for the people doing the work, use the separate AeroChat MCP connection guide for ChatGPT or Cursor setup instructions. Their account requirements and configuration methods are different, so do not reuse the Claude steps unchanged.