


How to Connect AeroChat MCP with Cursor

Connect AeroChat to Cursor by generating a scoped credential in AeroChat, copying the client configuration supplied there and adding it to Cursor's mcp.json file. Save the file, confirm the AeroChat server is enabled, inspect its tools and run a read-only test before allowing any write action.
This setup is more technical than the browser-based Claude connection because Cursor stores custom MCP servers in JSON. You do not need to build an MCP server, but you do need to edit the configuration without exposing the credential.
Choose project or global scope first
Cursor supports two main configuration locations:
| Scope | File | Use it when |
|---|---|---|
| Project | .cursor/mcp.json inside the repository |
The server is relevant to one project and the non-secret configuration should be shared with that project |
| Global | ~/.cursor/mcp.json in the user's home directory |
The same user needs the server in several projects |
Cursor's official MCP documentation confirms both locations and supports remote servers through Streamable HTTP or SSE. Use the configuration generated by AeroChat rather than guessing the transport or field names.
A project file can be committed to version control only if it contains no live secret. If AeroChat's generated snippet places the API key directly in the JSON, keep that file untracked or replace the secret with a supported environment-variable reference before sharing it.
1. Create the AeroChat credential with limited permissions
Open AeroChat's MCP integration and review the available permissions. Grant only the operations required for the Cursor task. Start with read access wherever possible, and use the current AeroChat feature directory to distinguish wider platform capabilities from tools actually exposed through MCP.
Generate the API key and copy it immediately. Treat it as a password. Do not paste it into a screenshot, issue, chat prompt or repository.
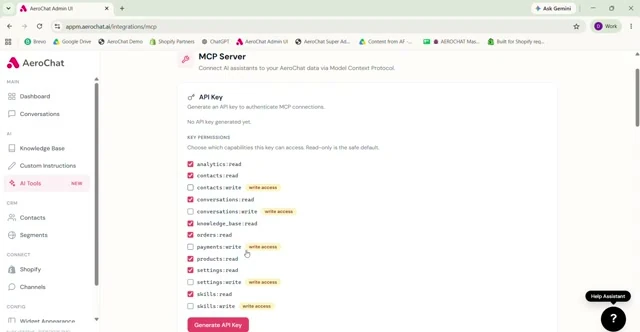
If the key is shown only once, store it in an approved password or secrets manager. Losing the displayed value should lead to rotation, not an attempt to recover it from logs or chat history.
2. Copy AeroChat's Cursor configuration
Use the client configuration supplied inside AeroChat. It should contain the correct server address and authentication structure for the current AeroChat MCP service.
The shape of a remote Cursor entry generally looks like this, but the AeroChat-generated snippet remains the source of truth:
{
  "mcpServers": {
    "aerochat": {
      "url": "AEROCHAT_MCP_URL_FROM_YOUR_ACCOUNT",
      "headers": {
        "Authorization": "Bearer AEROCHAT_API_KEY"
      }
    }
  }
}
Do not copy that illustrative placeholder unchanged. If AeroChat supplies different keys, a command-based client or a different authentication field, use the generated version.
3. Add the server to Cursor
Open Cursor's MCP settings and choose the option for a new server, or open the relevant mcp.json file directly. Paste the AeroChat entry inside the existing mcpServers object.
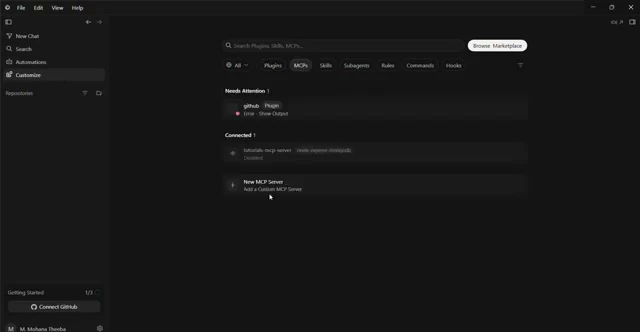
If the file already contains servers, merge the new property rather than pasting a second top-level mcpServers block. JSON does not allow trailing commas.
{
  "mcpServers": {
    "existing-server": {
      "url": "https://example.com/mcp"
    },
    "aerochat": {
      "url": "AEROCHAT_MCP_URL_FROM_YOUR_ACCOUNT",
      "headers": {
        "Authorization": "Bearer AEROCHAT_API_KEY"
      }
    }
  }
}
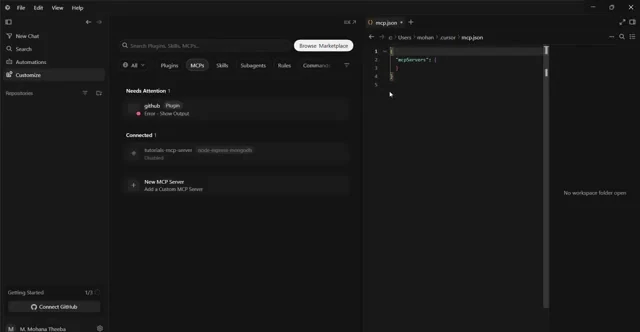
Save the file, return to Cursor's MCP settings and confirm that AeroChat is listed. Enable the server if it is off.
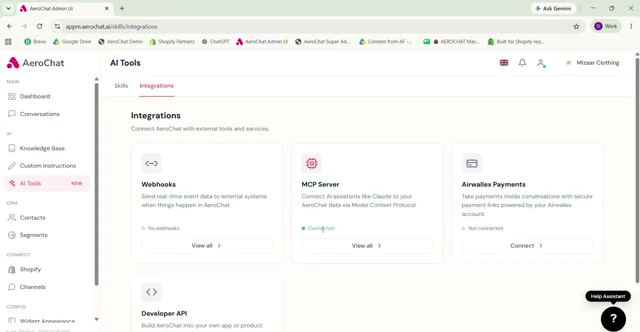
4. Inspect tools before asking Cursor to act
Cursor Agent can use enabled MCP tools when they are relevant. The separate explanation of how AI agent skills work covers how a defined capability can be selected for a matching task. In Cursor, first ask it to list the available AeroChat tools and describe their inputs before using one:
List the tools exposed by the AeroChat MCP server. Identify which are read-only and which could change data. Do not call a write tool.
Cursor requests tool approval by default and lets you inspect arguments. Keep that approval step enabled during testing. Auto-run is inappropriate until the team understands the effects of every enabled tool.
5. Verify a read operation against AeroChat
Use a test record that contains no unnecessary customer information. Ask Cursor for one narrow result, then compare it with AeroChat.
The result passes only if:
- the intended tool was called;
- the arguments contain the correct record identifier;
- no missing value was invented;
- the returned data matches AeroChat;
- the response states what was retrieved and what remains unknown.
This follows the same principle as AeroChat's guide to controlled chatbot actions: the connected system, not the model's wording, must confirm the result.
Keep API keys out of Git
The most serious setup error is committing a live credential. Before saving a project-scoped file, inspect your version-control status and the repository's ignore rules.
Use these safeguards:
- Prefer Cursor or AeroChat's supported secret-storage method if the generated configuration provides one.
- Use an environment variable only if Cursor and the supplied AeroChat client configuration support that syntax.
- Keep any file containing a literal key outside version control.
- Rotate the key immediately if it is committed, shared or shown in a recording.
- Use a separate key per person or client when AeroChat allows it, so one connection can be revoked without disrupting others.
Deleting a key from the latest commit is not enough if it remains in repository history. Rotate first, then follow your organisation's secret-removal process.
Project scope is a security and maintenance decision
Project scope makes the server definition visible to collaborators and keeps it tied to the relevant codebase. Global scope avoids putting configuration in a repository but can expose the tool to unrelated projects on the same machine.
Neither is automatically safer. Choose based on who needs the connection, where the secret is stored and whether the tool should be available outside one repository. Document the choice in the project setup notes without recording the credential.
Troubleshooting Cursor MCP failures
| Cursor status or symptom | Check first | Next action |
|---|---|---|
| Server does not appear | Invalid JSON or wrong file location | Validate the JSON and confirm project versus global path |
| Server appears red or disconnected | URL, transport or credential is wrong | Recopy AeroChat's generated snippet and rotate the key if uncertain |
| Tools list is empty | Server connected but tool discovery failed or permissions expose nothing | Restart the connection and review the AeroChat scope |
| Read works but write does not | The API key is read-only, or Cursor is awaiting approval | Keep read-only if sufficient; otherwise grant only the required action and retest |
| Cursor keeps requesting approval | Default tool approval is active | This is expected during safe testing; do not enable auto-run merely to hide the prompt |
| Teammate cannot connect | Their local secret or account permission is missing | Give each authorised user their own approved setup; never send your key through chat |
Cursor's command-line agent can also inspect configured servers with its MCP management commands, but the IDE status and a controlled tool result are enough for most setups.
How Cursor differs from Claude and ChatGPT
Cursor is centred on developer work and configuration files. Claude accepts a remote custom connector through its connector settings. ChatGPT uses a custom app and workspace developer-mode controls. These differences affect access, testing and secret handling.
Use the Claude MCP setup or ChatGPT MCP setup when that is the actual client. Copying a Cursor key-based snippet into a browser connector is not a supported shortcut.
Treat the connected status as the start of testing
A green indicator proves that Cursor can reach the server. It does not prove that the right permissions were granted or that every tool behaves correctly.
Finish by recording the configuration scope, key owner, enabled tools, successful read test and revocation route. Then expand one permission at a time. AeroChat can support operational customer-service workflows, but Cursor should receive only the access required for the developer task in front of it.