
How to Connect AeroChat MCP with ChatGPT
Connect AeroChat to ChatGPT by creating a custom MCP app in ChatGPT, entering the remote AeroChat MCP endpoint, completing authentication and scanning the tools that the server exposes. The current route is through Apps, not the older Plugins screen.
That distinction matters because ChatGPT's interface and plan access have changed. OpenAI's September 2026 guidance places custom MCP apps behind developer mode. Full MCP support is currently available on ChatGPT Business and Enterprise/Edu on the web; Pro users can connect MCP servers with read and fetch permissions. Workspace roles and policies can further limit who may create or publish an app.
Check access before opening the setup screen
You need:
- an AeroChat account with permission to configure the MCP integration;
- the remote MCP endpoint copied from AeroChat;
- ChatGPT on the web;
- developer-mode access for your ChatGPT account;
- an Admin or Owner if the app needs to be published for a workspace.
OpenAI notes that the MCP and developer-mode experience remains subject to change. If a label in this article has moved, check the current OpenAI developer-mode instructions before proceeding.
1. Get the AeroChat MCP endpoint
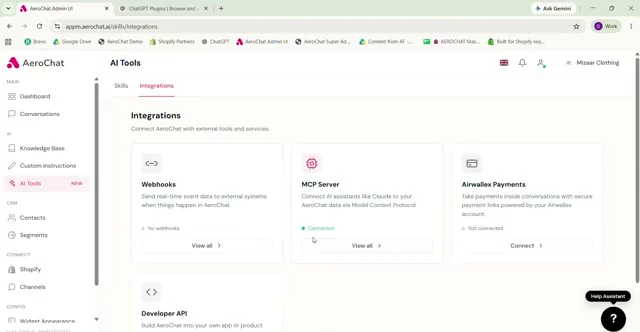
Sign in to AeroChat, open the MCP integration in the admin area and copy the endpoint provided for the connection. Keep it private and use the exact URL shown in your account.
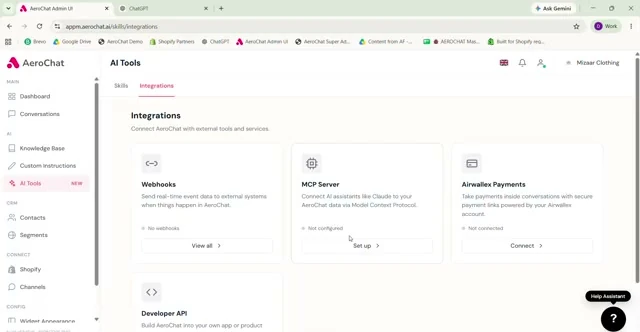
Review the AeroChat permissions at the same time. Decide whether ChatGPT only needs to retrieve information or whether a specific write action is necessary. The smallest useful scope is the safest starting point.
2. Enable developer mode in ChatGPT
For a Business workspace, an Admin or Owner can start from Workspace settings > Apps > Create. OpenAI also documents the developer-mode control under Workspace Settings > Permissions & Roles > Connected Data.
For Enterprise and Edu, an Admin can grant developer-mode access through workspace permissions. An authorised user then opens Settings > Apps > Advanced Settings and enables developer mode.
For Pro, developer mode can be used for custom apps with read and fetch permissions, but full write-capable MCP is not currently available on that plan.
If you do not see Create, confirm your plan, role and workspace policy. Looking for a plus button under Plugins will not solve this because that is the previous interface.
3. Create the AeroChat app
Open Apps > Create from the settings available to your role. Add a clear name such as AeroChat, provide the requested app metadata and paste the AeroChat MCP endpoint.
Choose the authentication method specified by AeroChat. If the server uses OAuth, complete the authorisation flow when ChatGPT opens it. Do not paste an AeroChat password or API key into a normal ChatGPT message.
Select Scan Tools and wait for ChatGPT to inspect the server. Review the names and descriptions returned by the scan before selecting Create.
The new app should appear as a development draft. In user settings it is labelled Dev; in the workspace area it appears under Apps > Drafts.
4. Test AeroChat in a new chat
Start a new conversation and choose the AeroChat development app from ChatGPT's tools menu. App selection applies to the message using it, so mention or select AeroChat again when a later request needs fresh data.
Begin with an inspection prompt:
List the AeroChat tools you can access. Separate read actions from anything that creates, changes or deletes data. Do not run a write action.
Then use a controlled test record and ask for one read-only result. Compare it with the record in AeroChat. A connection is not fully tested merely because the app appears in the menu.
5. Review action controls before publishing
Only Admins and Owners can publish a custom app for a workspace. Before publication, review which actions the app can perform and who may access it. Enterprise and Edu workspaces can use role-based access controls and action settings; OpenAI also documents parameter constraints for eligible non-sync apps.
Write actions deserve a stricter review than search or retrieval. Confirm that ChatGPT asks for approval where appropriate, that the AeroChat tool validates its inputs and that the source system confirms completion. AeroChat's wider guide to chatbot action controls explains why a model request is not the same as a completed business action.
Business workspaces should also note OpenAI's current restriction that published apps cannot be updated in place at launch. If the tools or metadata change, the Admin may need to recreate and republish the app. Check the current OpenAI documentation before relying on this behaviour because it is part of an evolving beta.
What the MCP connection changes
MCP gives ChatGPT an authorised path to the tools that AeroChat exposes. It can retrieve or act only within those tool definitions and permissions. It does not turn every capability on the AeroChat platform into a ChatGPT command, and it does not make ChatGPT the system of record.
AeroChat remains an AI agent platform for managing customer conversations across supported channels. The custom ChatGPT app is useful when an authorised team member wants to work with exposed AeroChat data or tools from ChatGPT. Customer-facing escalation still belongs in a support workflow such as AeroChat's human handover capability, not in an employee's ad hoc ChatGPT conversation.
A five-part acceptance test
Use this test before making the app available to other users.
| Test | Pass condition |
|---|---|
| Tool discovery | The scan shows only expected AeroChat tools with understandable descriptions |
| Read accuracy | A retrieved result matches the same record in AeroChat |
| Missing information | ChatGPT asks for a required identifier rather than inventing one |
| Write protection | A consequential action is blocked, constrained or requires the expected confirmation |
| Access removal | Disconnecting or disabling the app prevents further use as expected |
Record the test account, tool name, expected result and observed result. This gives the workspace owner evidence for the publishing decision and a baseline for future changes.
Troubleshooting current ChatGPT setup
Apps > Create is missing
Check the plan and role first. Business creation is limited to Admins and Owners. Enterprise/Edu users need permission from an Admin. Pro users have more limited MCP capabilities than full workspace plans.
The tool scan fails
Copy the endpoint again from AeroChat, confirm it is a remote HTTPS address and complete any authentication prompt. ChatGPT connects to remote MCP servers; it does not directly connect to a server that exists only on a local machine or private network.
The app exists but is not used
Select it from the tools menu for the message that needs AeroChat. In follow-up prompts that require new data, mention or select the app again.
A tool is visible but an action is blocked
Inspect both layers: the AeroChat permission attached to the connection and the ChatGPT workspace action control. A tool can exist while the current user or app policy prevents its use.
The instructions on screen say Plugins
Replace the old screenshot or cached guide. Current setup uses Apps and custom MCP app controls. This article should not be published with the former Plugins steps.
Finish with governance, not just a green status
A successful connection means ChatGPT can see the expected AeroChat tools and return a correct controlled result. A production-ready connection also has a named owner, limited permissions, documented tests and a removal process.
Teams using other clients should follow the client-specific process. Claude uses a remote custom connector workflow, while Cursor uses an mcp.json configuration. The endpoint may serve the same platform, but access control and setup are not interchangeable.