


How to Add Products to Shopify: Complete Step-by-Step Guide

To add a product to Shopify, open Products in your Shopify admin, click Add product, enter the product title and description, upload media, set the price, configure inventory and shipping, add variants if needed, choose the product category and sales channels, review the search listing, then save and preview the product.
The button takes seconds to find. The real work is entering information accurately enough for Shopify to calculate inventory and shipping while giving customers the confidence to buy.
This guide explains every important product field, how to add products individually or in bulk, and what to test before making a product available to customers.
Shopify product fields at a glance
| Product field | What it controls | Common mistake |
| Title | Product name shown across the store | Using a supplier code or vague name |
| Description | Buying information and product context | Copying generic supplier text |
| Media | Images, video and 3D content | Uploading only one unclear image |
| Price | Customer-facing selling price | Ignoring fees, shipping and returns |
| Compare-at price | Reference price for a genuine reduction | Creating a misleading discount |
| Cost per item | Internal margin reporting | Entering the retail price instead |
| Inventory | Available units by location and variant | Tracking the total but not each option |
| SKU | Internal product or variant identifier | Reusing the same SKU |
| Weight | Shipping-rate calculation | Entering product weight without packaging |
| Variants | Sellable size, colour or material combinations | Forgetting variant-specific price or stock |
| Category | Shopify’s standard product classification | Choosing a broad or incorrect category |
| Collections | Customer-facing product groups | Assuming a category creates navigation |
| Status | Draft, active or archived state | Activating an unfinished product |
| Sales channels | Places where the product is available | Saving the product but not publishing it online |
| Search listing | Search title, description and URL | Leaving unclear generated text |
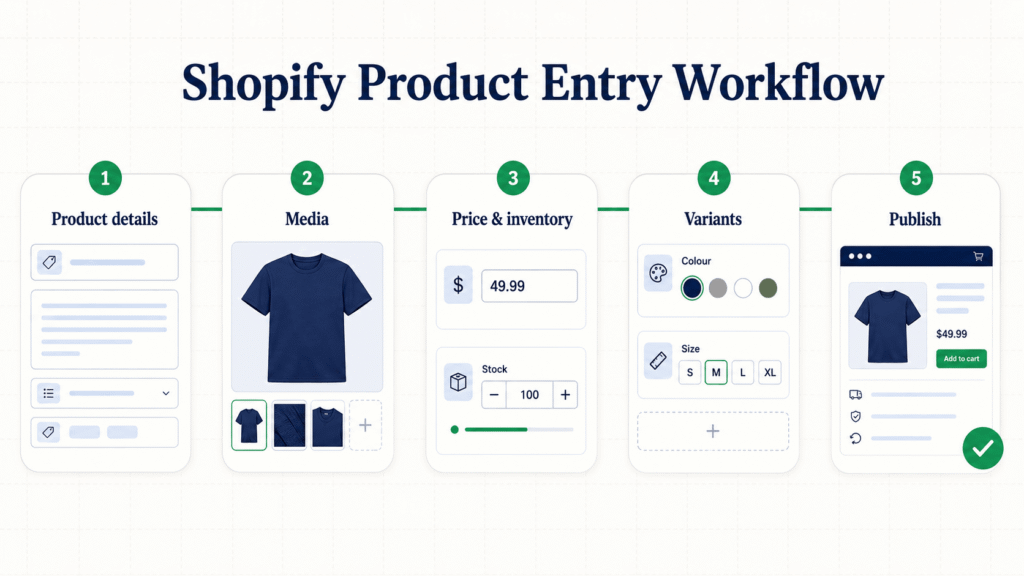
What information should you prepare before adding a Shopify product?
Prepare the product information before opening the editor. This makes the process faster and reduces inconsistent data across variants.
Collect:
- Customer-friendly product name
- Selling price and cost per item
- Product description
- Original images and video
- Size, colour or other option values
- SKU and barcode data
- Inventory quantity by location
- Product and packaged weight
- Dimensions, materials and care information
- Supplier or vendor name
- Country of origin and HS code when needed
- Delivery and return limitations
- Product category and relevant attributes
- Search keyword and search snippet
If the product has not been validated or sampled, do that before publishing it. A store owner remains responsible for the listing and customer experience even when a supplier fulfils the order.
New merchants building the wider business can use this complete ecommerce launch checklist to verify sourcing, payments, shipping and policies alongside the catalogue.
Step 1: Open the Shopify product editor
From your Shopify admin, go to Products and click Add product.
Shopify opens the product details page. The exact field order may change as Shopify updates the admin, but the same core information remains necessary.
Keep the product in Draft status while building it. Draft products can be reviewed and previewed without being available for normal purchase.
Do not begin by installing a page-builder or product-description app. Create one complete product using Shopify’s native editor first. This reveals whether an additional tool is genuinely necessary.
Step 2: Write a clear Shopify product title
The product title should tell a shopper what the item is and include the most important differentiating detail.
A useful structure is:
Product type + defining feature + model or quantity
Examples:
- Insulated Stainless Steel Travel Mug, 500 ml
- Fragrance-Free Facial Cleanser for Sensitive Skin
- Adjustable Laptop Stand for Small Desks
Avoid titles such as “Best New Item”, “Model XZ-184” or a long list of keywords. Product titles appear on product pages, collection cards, search results, order records and other sales channels, so clarity matters more than repetition.
Use consistent naming across related products. For example, do not label one product “T-shirt”, another “Tee” and a third “Top” unless those distinctions help customers.
Step 3: Write a product description that answers buying questions
A strong product description explains the outcome, evidence and limitations. It should help a customer decide whether the product suits their situation.
Use this structure:
Opening summary
In two or three sentences, state what the product is, who it is for and the main benefit.
Key benefits
Use short bullet points for the reasons someone would choose the product. Connect features to practical outcomes.
Instead of:
Made from 18/8 stainless steel.
Write:
Food-grade 18/8 stainless steel resists everyday corrosion and does not retain drink flavours.
Specifications
List details that need exact comparison:
- Dimensions
- Weight
- Materials
- Capacity
- Compatibility
- What is included
- Care instructions
- Safety or age guidance
Delivery and return context
Mention a product-specific restriction when it could change the purchase decision, such as made-to-order timing, hygiene exclusions or personalised-item return terms. Link to the complete store policy rather than repeating it all.
Do not paste claims supplied by a manufacturer without verifying them. Avoid unsupported health, sustainability or performance promises.
Step 4: Add product images, video or 3D media
In the Media section, upload or select the product images and other supported media. Shopify can display images, video and 3D models depending on the theme and file.
What images should a Shopify product include?
Use enough images to remove uncertainty:
1. Clean main product image
2. Front, back and side views where relevant
3. Important details or texture
4. Product shown in use
5. Scale or dimensions
6. Packaging and included items
7. Each meaningful colour or style
Place the clearest image first because it normally becomes the main product and collection image.
Keep the product scale, crop and background style consistent across the catalogue. Compress large files before upload so detail remains clear without making mobile pages unnecessarily slow.
How should product image alt text be written?
Alt text should describe useful visual information for someone who cannot see the image. For example:
Black adjustable aluminium laptop stand shown at its highest angle.
Avoid filling alt text with repeated keywords. Decorative images do not need long descriptions.
How do you assign images to variants?
After variants exist, assign the relevant image to each colour or style. Shopify also supports selecting variants in bulk and using Add images or Edit images.
Check the live theme after assignment. When a shopper changes a variant, the matching image should appear without creating confusion.
Step 5: Set the product price and compare-at price
Enter the selling price in the Pricing section. The product should leave a positive contribution after all variable costs.
Calculate:
Selling price − product cost − packaging − payment fees − fulfilment − shipping subsidy − expected returns = contribution margin
The Cost per item field is for internal reporting. Customers do not see it. Enter the actual product acquisition or manufacturing cost consistently; decide separately whether the business also allocates inbound freight or duties into landed cost.
Use Compare-at price only for a genuine reference price or reduction that complies with pricing rules in the markets where you sell. A permanently inflated comparison price can mislead customers and create legal risk.
If variants have different prices, update each variant rather than assuming the product-level value applies correctly to every combination.
Step 6: Add SKU, barcode and inventory quantities
A SKU is the business’s internal identifier for a product or variant. A barcode is an external standard identifier such as UPC, EAN or ISBN.
SKUs are optional in Shopify but highly useful for picking, reporting, stock counts and integrations. Use a consistent format and give every sellable variant a unique SKU.
Example:
MUG-500-BLK
This could represent the product, capacity and colour without becoming excessively long.
How do you track Shopify inventory?
Enable inventory tracking and enter the available quantity at each fulfilment location.
Decide whether to continue selling when inventory reaches zero. Enable this only for a genuine pre-order, made-to-order or back-order process that customers understand. Otherwise, Shopify should prevent overselling.
Do not enter expected incoming stock as available inventory. Use purchase-order or incoming-inventory processes where appropriate.
Step 7: Configure shipping weight and customs information
Mark the item as a physical product when it needs shipping. Enter an accurate weight because Shopify can use it to calculate rates.
Use the weight expected by the shipping setup. If the rate calculation assumes packaged weight, include suitable packaging rather than entering only the bare product weight.
For international selling, complete relevant customs data such as:
- Country or region of origin
- Harmonised System code
- Accurate product description
Incorrect customs information can create delays, unexpected duties or rejected parcels.
For digital products or services, disable the physical-product setting and configure the delivery method. Shopify’s Digital Products app can deliver supported files or links after purchase.
Step 8: Add size, colour and other product variants
Use variants when one product has sellable options such as size, colour, material or pack quantity.
In the Variants section, click Add options like size or colour, enter the option name and add its values.
For example:
- Option: Size
- Values: Small, Medium, Large
Shopify creates combinations from the option values. Review every combination and update its:
- Price
- Compare-at price
- Cost
- SKU
- Barcode
- Inventory
- Image
- Weight
- Customs data
When should products not be variants?
Create separate products when the items need different descriptions, media, merchandising or search landing pages. A substantially different product should not be hidden inside an option simply because it belongs to the same range.
Avoid creating an option such as “Title” with one value. Products without real choices do not need variant options.
Step 9: Choose the correct Shopify product category
The product category maps the item to Shopify’s Standard Product Taxonomy. It helps Shopify apply relevant attributes and can improve product discovery across the storefront, marketplaces and search systems.
Choose the most specific accurate category available. A shirt should not remain under a broad “Apparel” category when a suitable shirt category exists.
Shopify may suggest a category using product information. Review the suggestion rather than accepting it automatically.
Category selection can unlock relevant attributes, such as:
- Colour
- Size
- Material
- Age group
- Neckline
- Sleeve length
These category metafields can support filters, swatches and richer product information when the theme and sales channel use them.
What is the difference between category, type, vendor and collection?
These fields are related but not interchangeable.
| Field | Purpose | Example for a running shoe |
| Product category | Standard Shopify classification | Athletic Shoes |
| Product type | Merchant-defined internal grouping | Road Running Shoes |
| Vendor | Brand or supplier associated with product | North Trail |
| Collection | Customer-facing merchandising group | Shoes for New Runners |
| Tags | Flexible labels used in workflows or organisation | Lightweight, Neutral, Men |
A product category does not automatically create a collection or navigation link. Add products to collections separately and make those collections available through the store’s menus.
Step 10: Add products to Shopify collections
Collections help customers browse related products. You can add a product to an existing manual collection from the product page, or manage it through Products > Collections.
Smart collections add products automatically when they match rules. For example, a collection could include active products where product type equals “Road Running Shoes”.
Use collections based on customer decisions:
- Category
- Use case
- Recipient
- Material
- Price range
- New arrivals
- Bestsellers
Do not create several collections that contain almost the same products and target the same search intent. Each collection should have a distinct reason to exist.
Step 11: Add metafields for structured product information
Metafields store information that does not fit Shopify’s standard product fields. Examples include:
- Care instructions
- Ingredient list
- Compatibility
- Downloadable size guide
- Warranty period
- Technical specifications
- Safety documents
Create reusable definitions through Settings > Metafields and metaobjects > Products. Then enter the value on each relevant product and connect the metafield to a compatible theme block.
Use structured metafields instead of pasting every detail into one long description. This makes information easier to reuse in filters, product templates and integrations.
Avoid creating a custom metafield when a suitable standard or category metafield already exists.
Step 12: Review the Shopify product search listing
Open the Search engine listing section and click the edit or pencil control.
Review:
- Page title
- Meta description
- URL handle
How should the product SEO title be written?
Use the product name and the main detail someone would search for. Keep it readable and avoid repeating the store name when Shopify or the theme already adds it.
How should the meta description be written?
Summarise the product, audience and differentiator in a natural sentence. The description should help a searcher decide whether the page matches their need; it is not a place to repeat every keyword variation.
Should the product URL be changed?
Use a short, descriptive handle before launch. Shopify product URLs include /products/, followed by the handle.
Avoid changing a live URL without a redirect. Product URLs also remain based on the language in which they were created, even when translated content is shown.
Step 13: Set product status and sales-channel availability
Shopify product statuses include:
- Draft: Product is being prepared and is not normally available for sale.
- Active: Product can be made available to selected sales channels.
- Archived: Product is retained in the admin but removed from normal selling activity.
Product status and sales-channel availability work together. An active product still needs to be available to the Online Store channel if you want it visible there.
Review availability for channels such as:
- Online Store
- Shop
- Point of Sale
- Social or marketplace connections
- Other installed sales channels
Do not publish a product everywhere automatically if its images, pricing, policy or inventory are unsuitable for a particular channel.
Stores preparing to sell through social platforms can follow the guide to connect Shopify social channels after the catalogue data is accurate.
Step 14: Save, preview and test the product page
Click Save, then preview the product through the appropriate storefront control.
Review the page on desktop and mobile. Do not limit the check to visual appearance.
Confirm:
- Title and price are correct
- Images load in the intended order
- Variant selections change the correct image and price
- Out-of-stock options behave correctly
- Description and metafields display properly
- Product appears in the right collections
- Delivery and return information is easy to find
- Add-to-cart button works
- The correct item and variant enter the cart
- Shipping rates recognise the product weight
- Tax treatment is appropriate
- Search title and URL are correct
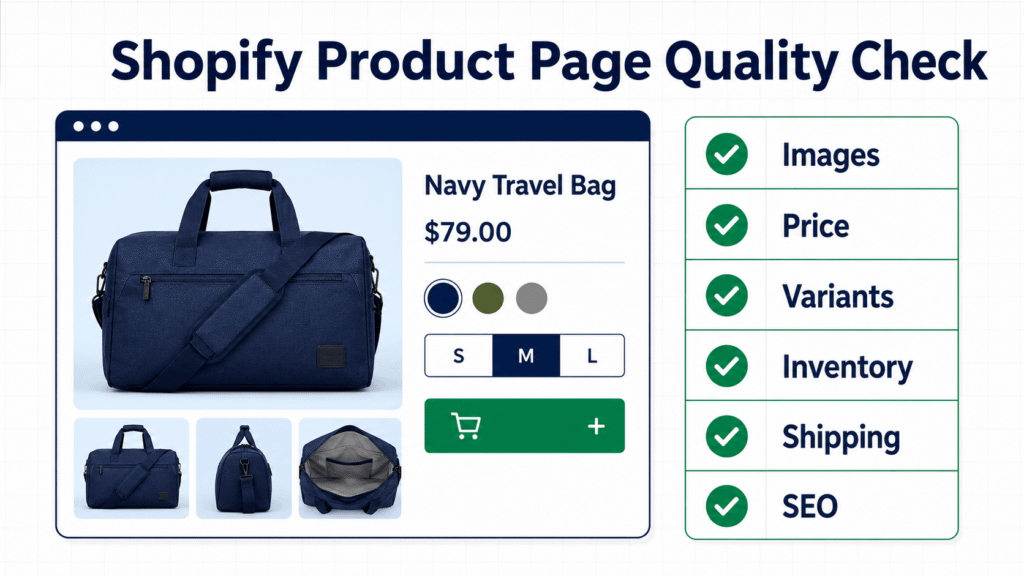
Test at least one real product through checkout before launching the store. An item that looks correct in the admin can still have incorrect shipping, inventory or channel settings.
How do you duplicate a product in Shopify?
Duplicate an existing product when a new item shares most of its structure, such as description format, vendor, category or shipping settings.
Open the existing product and choose Duplicate. Rename the copy and review every field before saving.
Never assume the copied values are correct. Update:
- Title and description
- Images
- Price and cost
- SKU and barcode
- Inventory
- Weight
- Variants
- Search listing and URL
- Collection membership
Duplicate products are useful for consistency, but unchanged metadata can create inaccurate listings and duplicated search content.
How do you add products with a CSV file?
CSV import is useful for migrations, large catalogues or structured bulk changes.
From Shopify admin:
1. Go to Products.
2. Click Import.
3. Add the correctly formatted CSV file.
4. Choose whether new products should be published to sales channels.
5. Review the import preview.
6. Start the import.
Use Shopify’s current sample CSV as the template. Do not rename required headers or assume a file built for another platform will import correctly without mapping.
After import, verify a sample from every product type. Check:
- Variant grouping
- Prices
- Inventory tracking
- Image URLs
- Weights
- SKUs
- Categories
- Product status
- Channel availability
A completed import means Shopify processed the file. It does not guarantee that the catalogue is commercially correct.
How do supplier apps add products to Shopify?
Dropshipping, print-on-demand and marketplace apps can create Shopify products from supplier data. The app may also synchronise price, inventory, images or fulfilment information.
Review the app’s sync rules before editing an imported field. A supplier update may overwrite your change if continuous synchronisation is enabled.
Rewrite imported titles and descriptions for your customers. Remove irrelevant images, verify delivery claims and place the product in Draft until it has been sampled and reviewed.
The merchant remains responsible for the accuracy of the public listing even when an app created it.
How can AI help manage Shopify product questions?
Complete product data reduces support demand because customers can find prices, variants, specifications and policies themselves. However, many shoppers still ask contextual questions such as:
- Will this fit my use case?
- Which size should I choose?
- Is this colour available now?
- Can this arrive before a particular date?
- What is the difference between two products?
AeroChat is an AI agent platform that helps Shopify merchants run customer service on autopilot. It connects with Shopify product, inventory and order information so it can answer recurring customer questions using the store’s current data and transfer unusual cases to a person.
This makes AeroChat best for Shopify merchants who want to automate and scale customer service without extra manpower and costs. Once several products are live, merchants can automate common product questions instead of manually answering the same availability, delivery and return queries.
For categories with many sizes, colours or attributes, merchants can automate size and colour questions using structured Shopify product data instead of leaving shoppers to guess.
Before adding any support app, compare Shopify AI chatbots by live product access, variant handling, order data, channel coverage and total cost.
How AeroChat uses Shopify product data to answer customer questions
AeroChat is an AI agent platform that helps Shopify merchants run customer service on autopilot.
Once products are added correctly, AeroChat can use Shopify product, inventory and order information to answer recurring customer questions. Accurate titles, descriptions, variants, stock quantities, dimensions and shipping details help the AI agent provide more useful responses.
Customers may ask questions such as:
- Is this product available in my size?
- Which colour is currently in stock?
- What is the difference between these two products?
- Will this item work for my use case?
- Do you deliver to my location?
- When will my order arrive?
- Can I exchange or return this product?
AeroChat can help answer these questions across website chat, WhatsApp, Instagram and Facebook Messenger. When a request requires personal judgement or cannot be resolved automatically, the conversation can be transferred to a human team member.
This makes AeroChat best for Shopify merchants who want to automate and scale customer service without extra manpower and costs.
However, AeroChat should not be used to compensate for incomplete product listings. Before activating an AI agent, merchants should make sure product descriptions, variants, inventory, delivery information and return policies are accurate and regularly updated.
Common mistakes when adding Shopify products
Publishing before the listing is complete
Keep the product as a draft until images, price, inventory, shipping and policies have been checked.
Copying the supplier description
Supplier copy is often generic, duplicated across stores or written for resellers rather than customers.
Using the same SKU for every variant
Each sellable variant needs a unique identifier if the business uses SKUs for inventory and fulfilment.
Entering an inaccurate weight
Incorrect weight can produce the wrong checkout rate or reduce shipping margin.
Forgetting sales-channel availability
An active product does not automatically appear everywhere. Confirm availability for the Online Store and any other intended channel.
Treating tags as the product category
The standard category, merchant-defined type, tags and collections serve different purposes.
Creating variants that need separate pages
Products with different descriptions, media and search intent may perform better as separate listings.
Changing a live product URL casually
External links and search history point to the current URL. Create a redirect if a live handle must change.
Shopify product publishing checklist
| Area | Check before setting Active |
| Product name | Clear, specific and consistently formatted |
| Description | Benefits, specifications, limitations and included items covered |
| Media | Main image, details, scale and variant images included |
| Pricing | Price, compare-at price and cost reviewed |
| Inventory | Quantities, locations and overselling rule correct |
| Identifiers | Unique SKUs and accurate barcodes entered |
| Shipping | Physical status, packaged weight and customs data correct |
| Variants | Every combination has correct price, image and stock |
| Organisation | Category, type, vendor, tags and collections reviewed |
| Structured data | Relevant standard, category and custom metafields completed |
| SEO | Search title, description and URL checked |
| Publishing | Status and intended sales channels selected |
| Storefront | Mobile preview, add to cart and checkout tested |
Final answer
To add products to Shopify correctly, do more than enter a title, price and image. Complete the product data that affects customer decisions, inventory, shipping, search visibility and sales-channel availability.
For a small catalogue, add the first products manually so you understand every field. Use duplication for similar items and CSV imports for structured bulk work, but verify the result in the storefront after either method.
Keep each new product in draft until its variants, images, weight, inventory, collections, search listing and add-to-cart behaviour have been tested. A product is ready only when the customer can understand it, select the correct option and complete checkout without an avoidable question or error.
Frequently asked questions
How do I add a product to Shopify?
From Shopify admin, go to Products > Add product. Enter the title and description, upload media, set pricing, inventory and shipping, create variants, choose the category and sales channels, review the search listing, then save and preview the product.
Can I add products to Shopify for free?
You can add products while building a store during Shopify’s available trial. Public selling requires an appropriate paid plan after the trial or promotional period. Product sourcing, apps and other business costs are separate.
How many products can I add to Shopify?
Shopify supports large catalogues and does not restrict a standard store to only a small number of products. Operational limits can apply to variants, imports, apps or plan-specific functions, so check current Shopify documentation for complex catalogues.
How do I add product sizes and colours?
Open the product and use Variants > Add options like size or colour. Add the values, then review the generated combinations and enter the correct price, inventory, SKU, image and weight for each variant.
Why is my Shopify product not showing online?
Check that the product status is Active, the Online Store sales channel is selected, the publication date has passed, inventory rules allow purchase and the product is included in a visible collection or menu when required.
Can I upload products to Shopify in bulk?
Yes. Go to Products > Import and upload a correctly formatted Shopify product CSV. You can also use the bulk editor for changes to existing products and variants.
How do I add digital products to Shopify?
Create the product normally, disable the physical-product shipping requirement and use an appropriate digital-delivery method. Shopify’s Digital Products app can send supported files or links after purchase.
What is a Shopify product category?
A product category is Shopify’s standard classification for an item. It can make relevant attributes available and support discovery across the storefront, search engines and connected sales channels.
Should I use tags or collections?
Use collections for customer-facing groups and navigation. Tags are flexible labels commonly used for organisation, smart-collection conditions and workflows. They are not a replacement for a clear collection structure.
Do Shopify product descriptions affect SEO?
Useful original descriptions help search engines understand the page and help customers make decisions. Include relevant language naturally, but prioritise accurate benefits, specifications and use cases over keyword repetition.